
One VEGAN HAM to Rule Them All
As an Amazon Associate I earn from qualifying purchases.
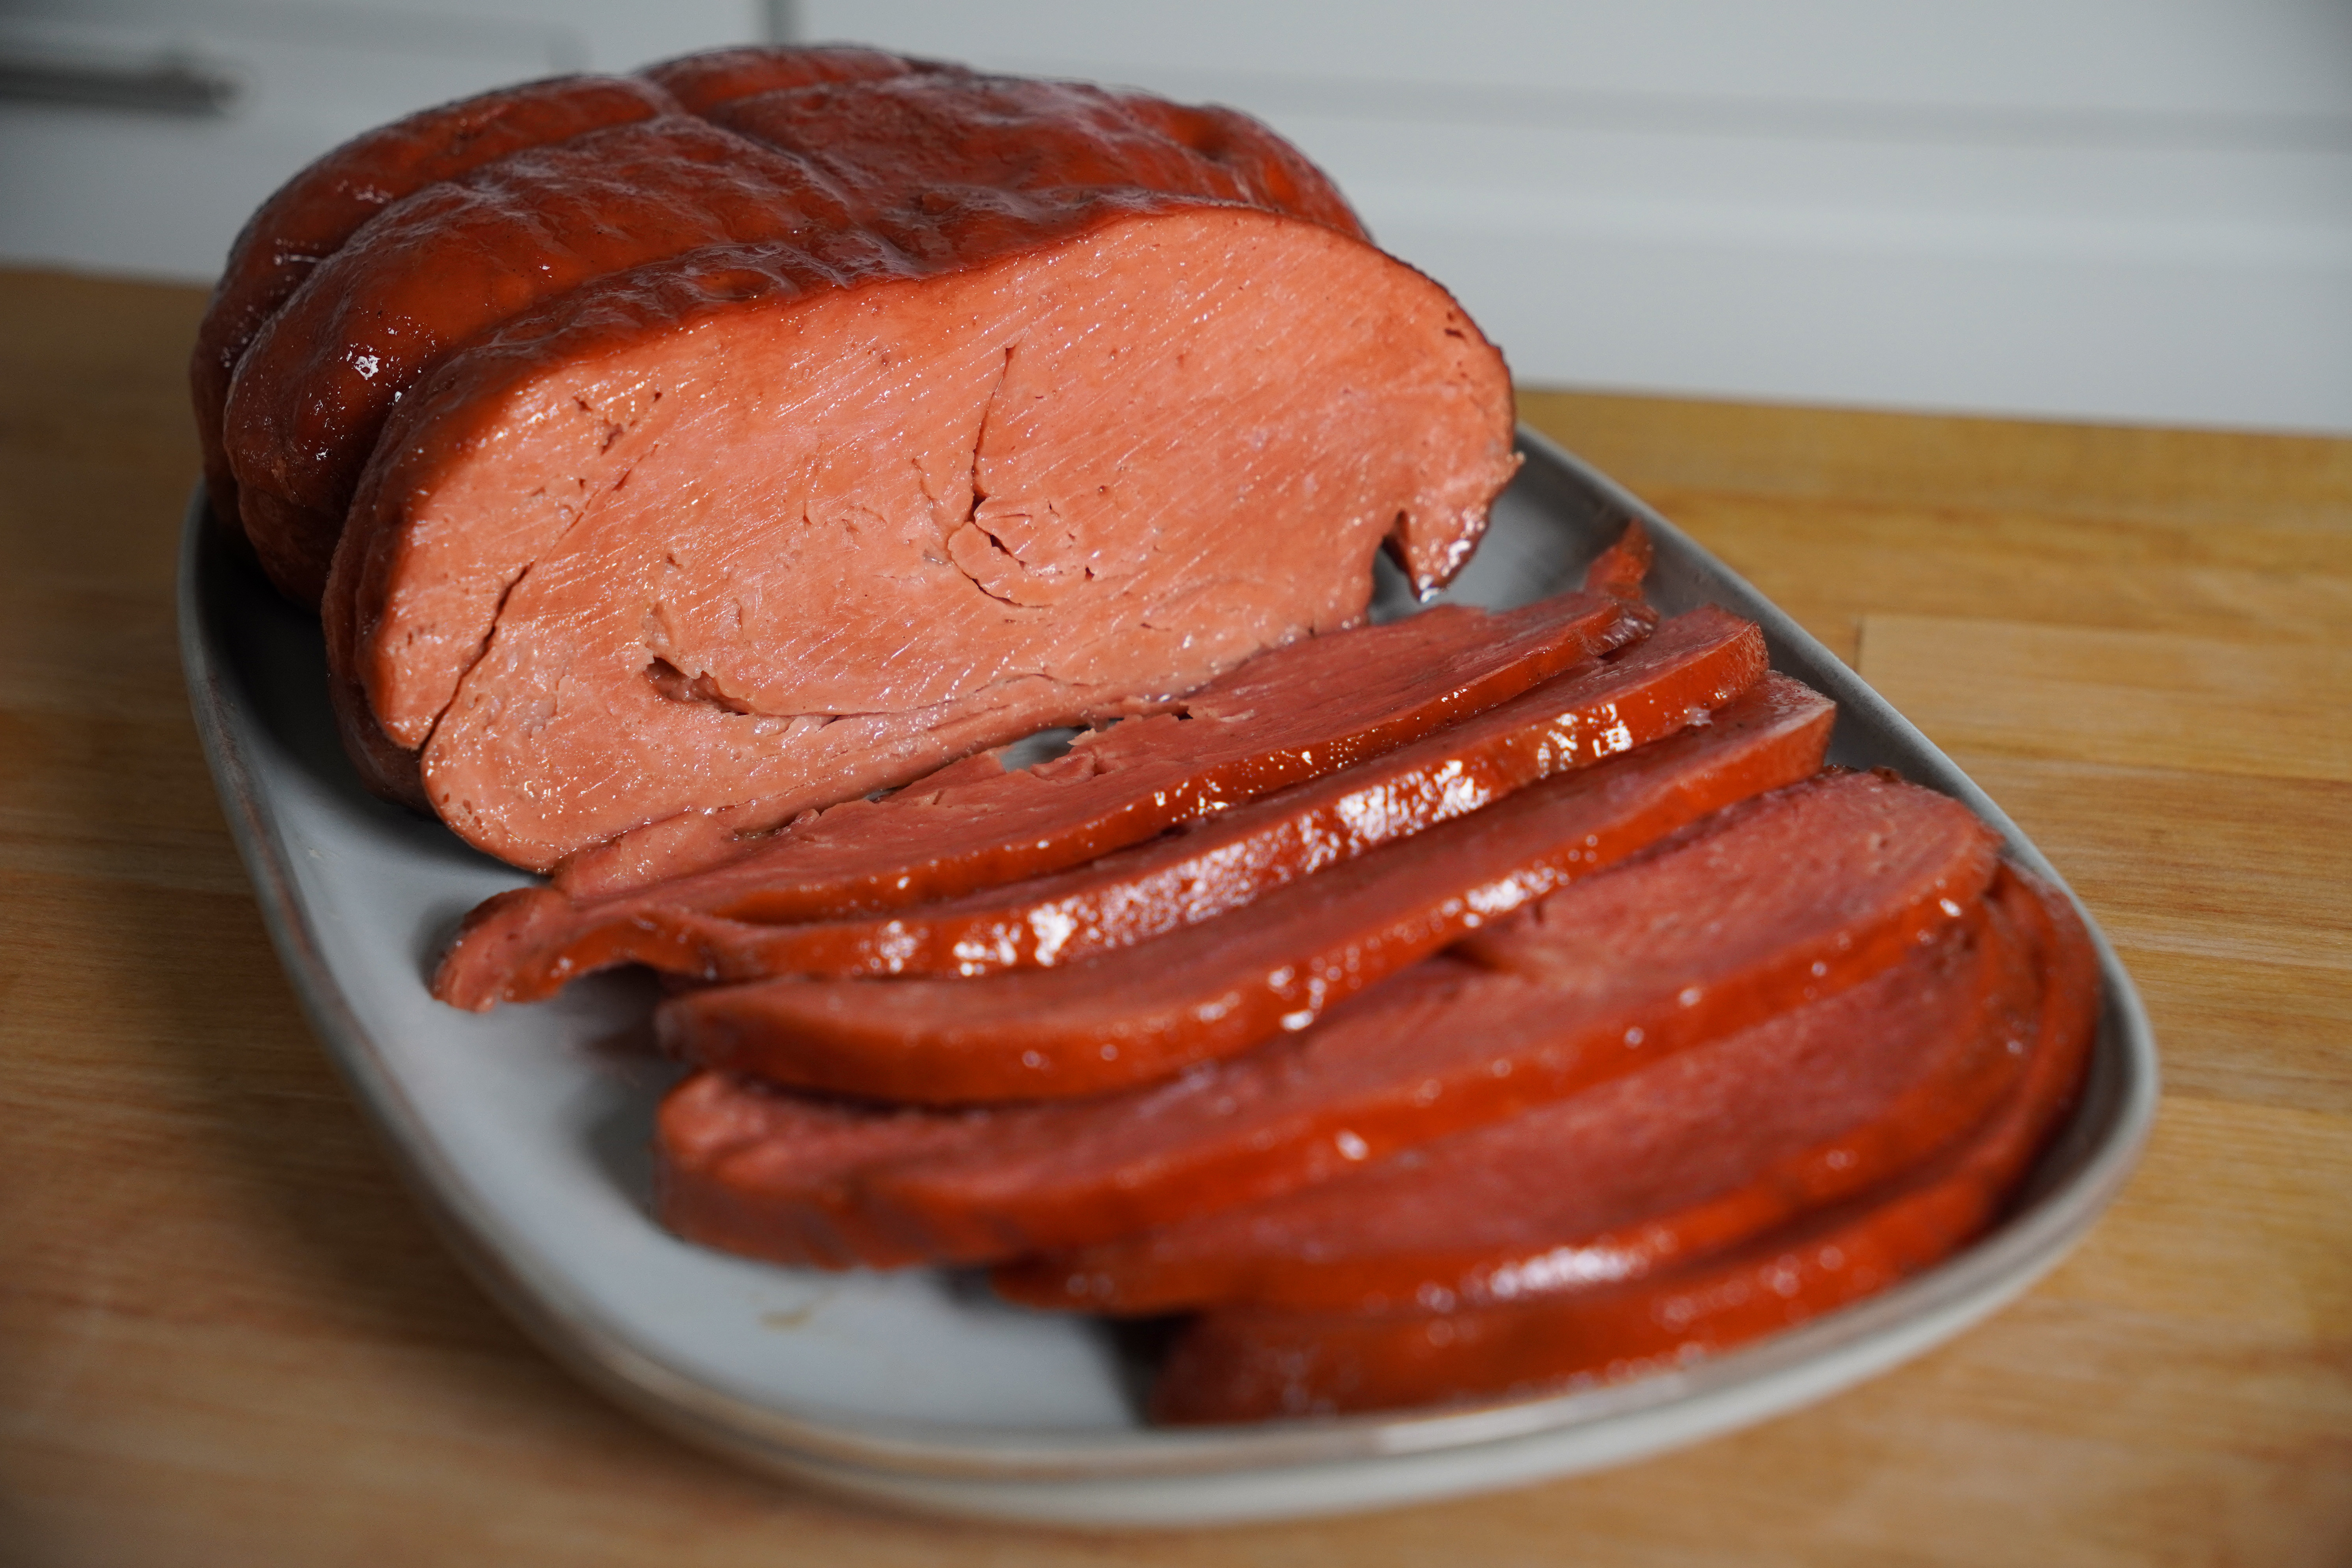
This show-stopper vegan ham is perfect for holiday dinners or for those who want the best plant-based ham they can get. It has an incredible texture and that signature salty-sweet ham flavor, let’s get into it:
Ingredients Needed To Make Vegan Seitan Ham
- All-Purpose Flour
- Cold Water
- Red Food Dye (McCormick’s brand is vegan)
- Vegan Butter (any brand)
For the Seasoning Mix:
- Kosher Salt
- Brown Sugar (or white sugar & molasses)
- Onion Powder
- Mushroom Powder
For the Brine:
- Salt
- Soy Sauce
For the Glaze:
- Maple Syrup
- Brown Sugar
- Liquid Smoke Flavoring
- Vegan Worcestershire Sauce
- Ground Cloves
Equipment Needed to Make Vegan Seitan Ham
- 2 large mixing bowls
- Colander
- Cheese Cloth
- Cooking Twine
- Slow cooker (I use an Instant Pot with slow cooker function)
How To Make Vegan Seitan Ham
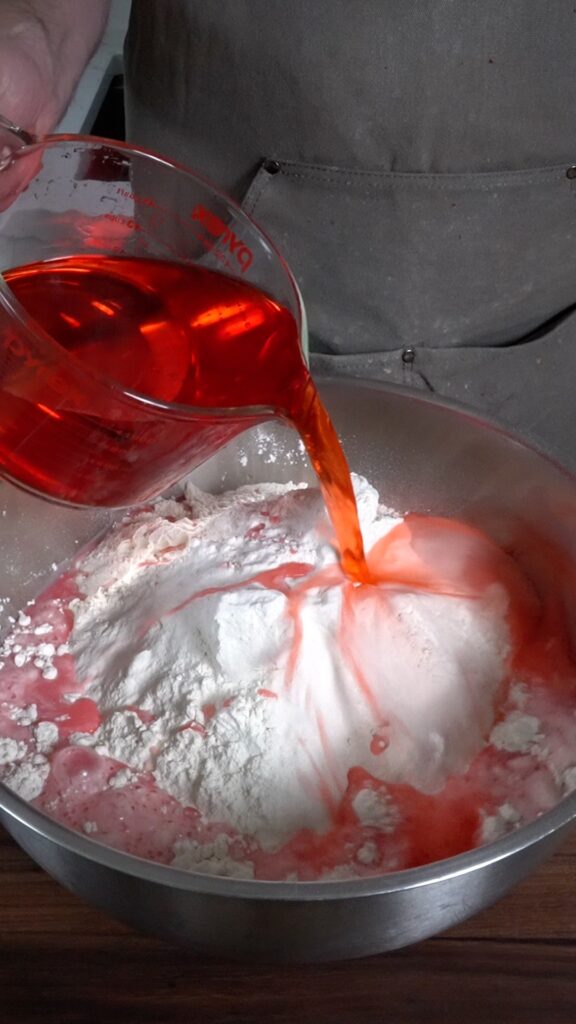
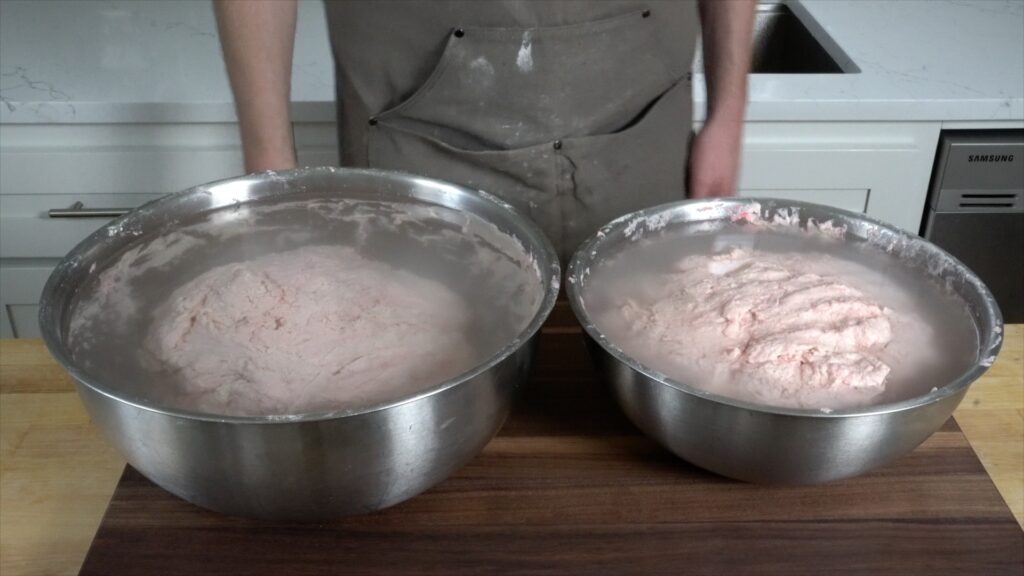
- Prepare the Dough: Mix cold water and red food dye. Pour into the flour to form two dough balls.
- Let them rest in water for 1 hour.
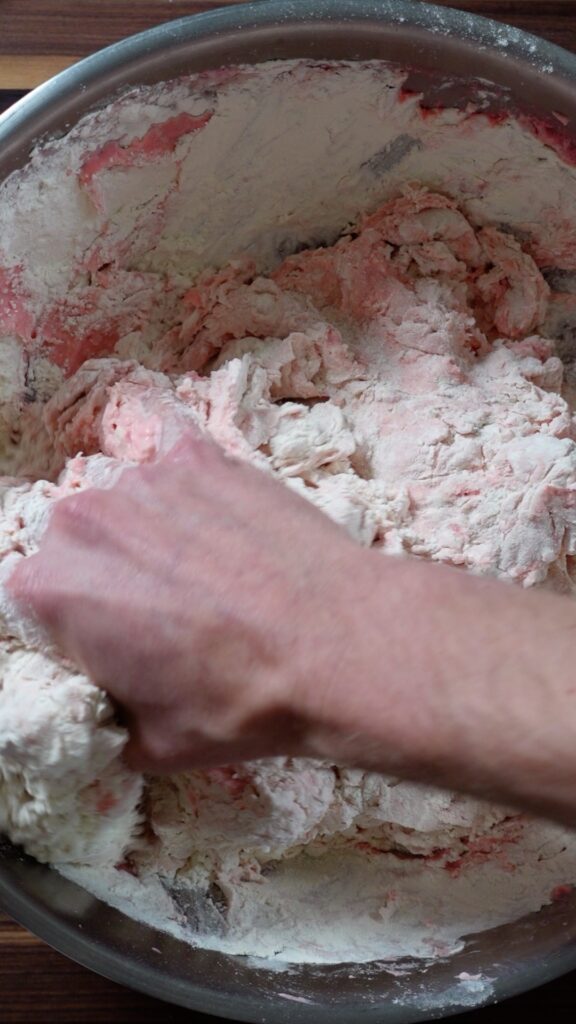
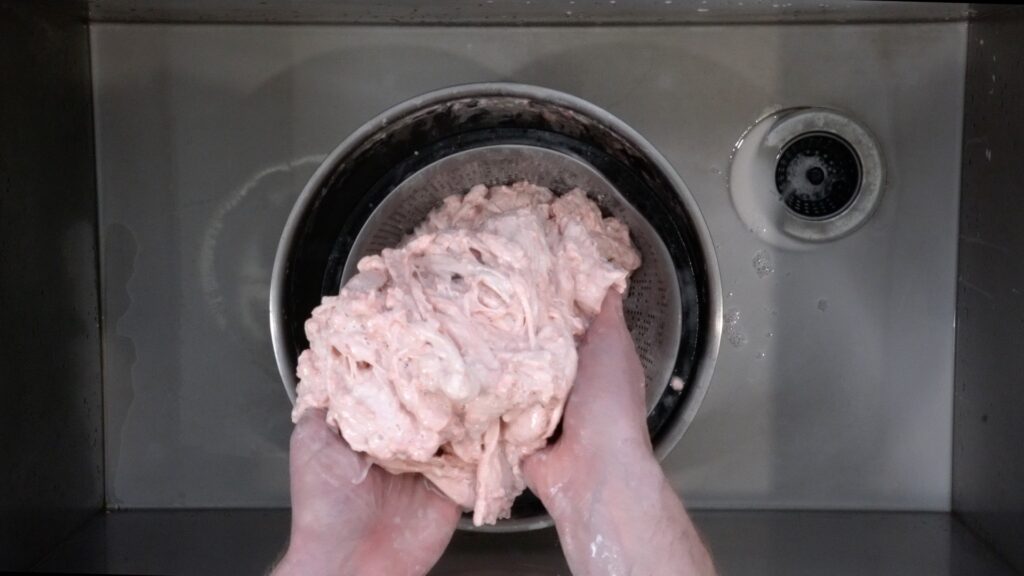
- Wash the Dough:
- In this step we will be massaging or, “washing” the starch out of the flour leaving only the gluten behind. You will do this over the course of 5-6 washes and it will take a total of about 30 minutes (15 minutes for each . Put in some headphones, pop on a podcast and dig in!
- Do this in your sink as it can get messy if you’re not careful!
- Here is what the doughs looked like at the end of each of the five washes:


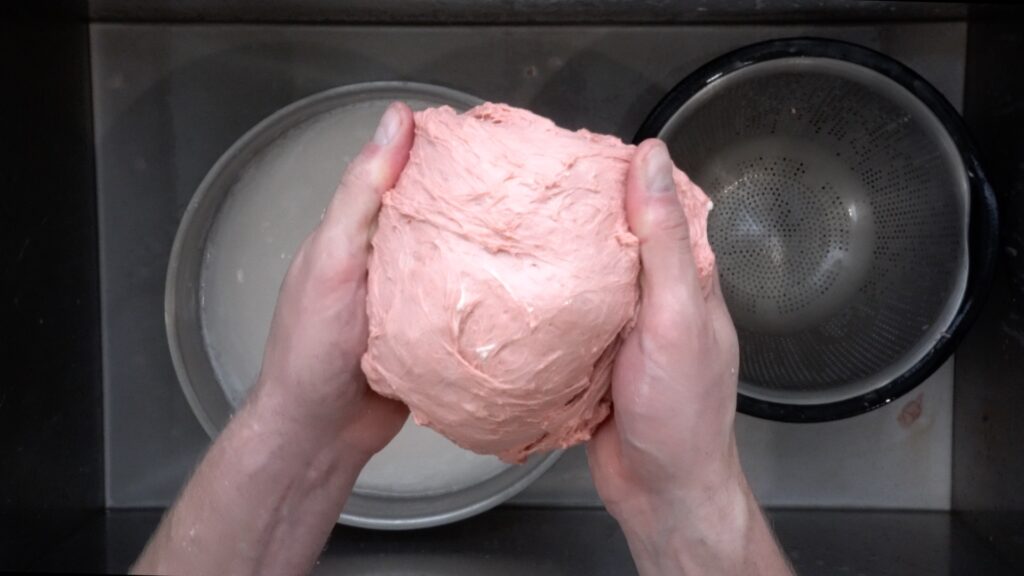
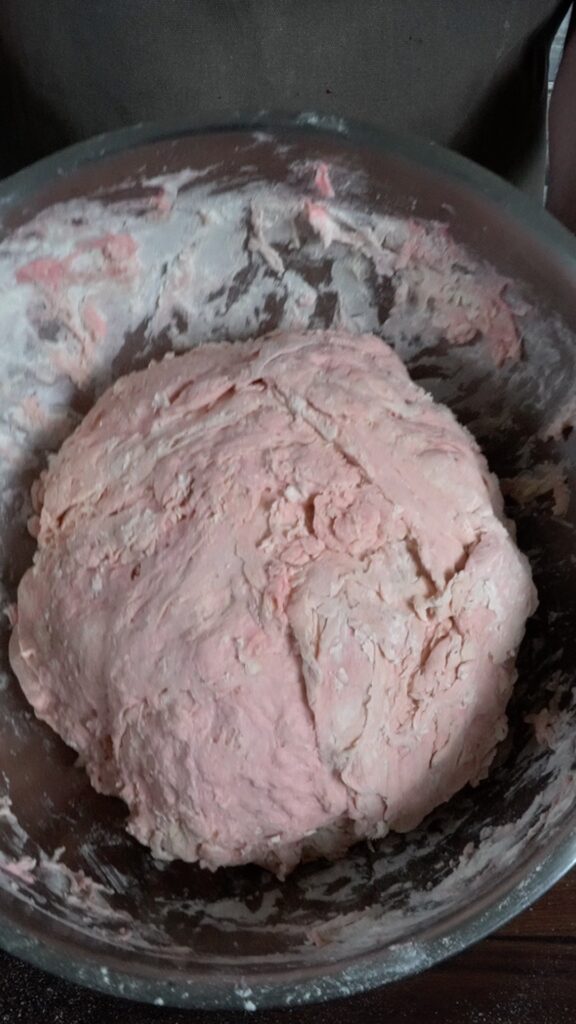
- Once BOTH doughs are washed, let them rest together in a strainer for at least 30 min but up to 24 hours if you want to take a break.
- During the rest, make the seasoning mix. (Remember to use kosher salt.)
- Here is what it looked like after about an hour rest. Notice the two doughs have fused together and it is smooth, dry, and sticky with flecks of starch. This right here is a good looking piece of gluten:
- Season the Dough:
- Next we’re going to rip the seasonings into the dough. I like to think of this technique as Season, Tear, Fold.
- SEASON with about a quarter of your seasoning mix:

- TEAR apart a thick part of the dough. You can tear multiple times before seasoning again. The more you tear, the better the final texture will be. It might seem like you’re destroying the dough, but by tearing apart, you’re breaking the gluten and when it rests and forms back together, the bonds will be imperfect which is what creates that satisfying bite.
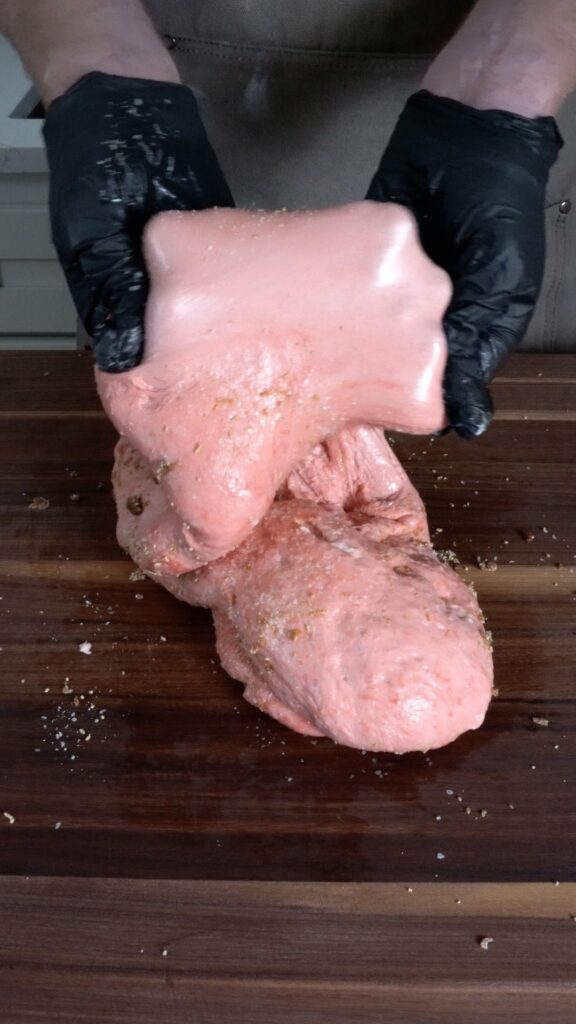

- FOLD and stretch the dough onto itself to find unseasoned parts, then season. You will be able to tell when a part is unseasoned as it will be a lighter color then the seasoned part of the dough.
- Repeat these steps (Season, Tear, Fold) until you have no seasoning left.

- You are done when your dough is torn up, resembles raw meat, and you are out of seasoning mix. Osmosis and all the tearing will be drawing water out of the roast at this point as well.
- Note that you should tear up the dough many times during the tear stages.
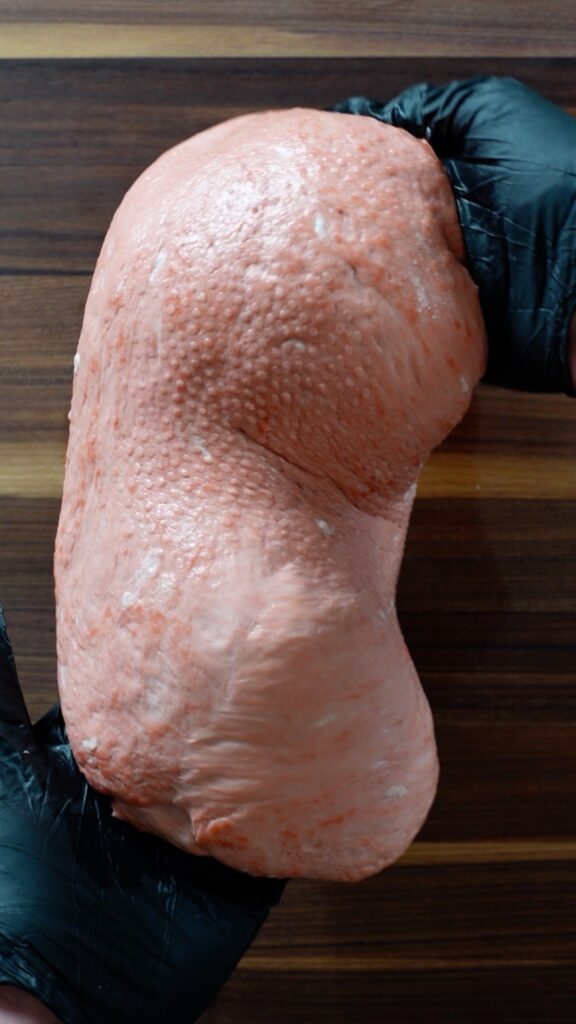
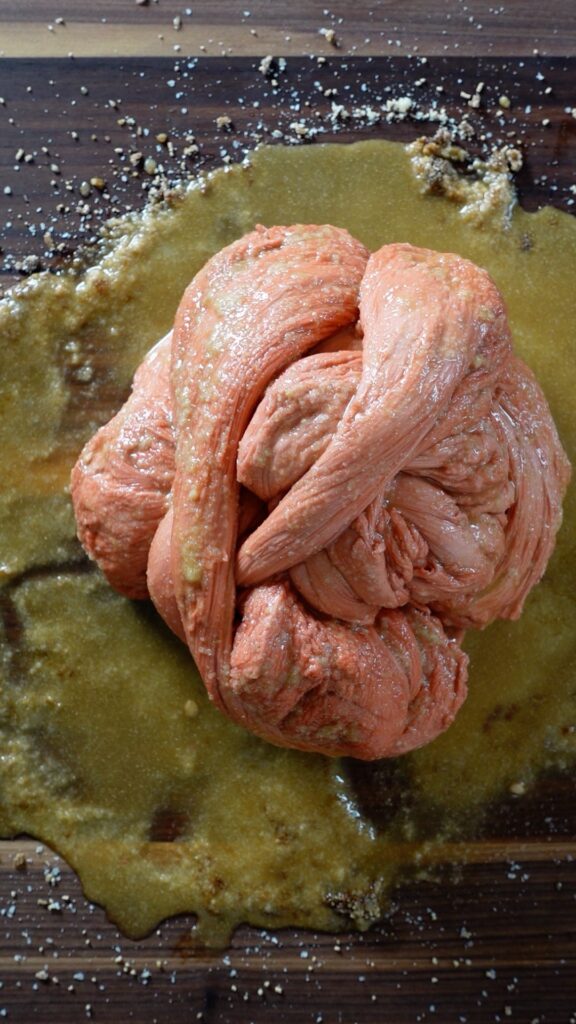
- At this point, tuck and knot the roast back together into a ball.

- I repeated the Season, Tear, Fold method about four times to get the ball in the picture below and then folded and knotted all the strands back into the roast.
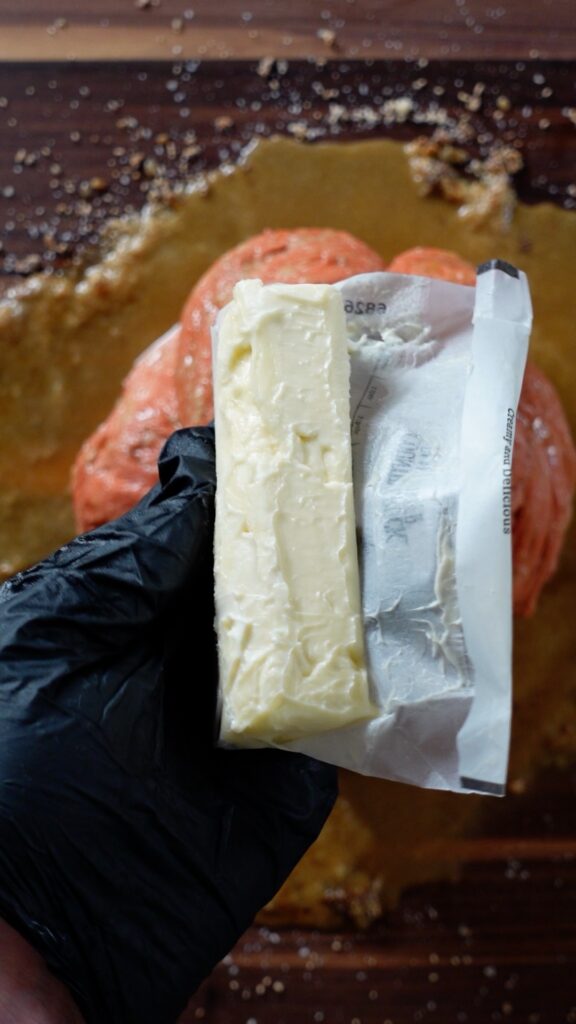
- Fatten the dough:
- Tear off 1 tbps chunks of vegan butter and jam them deep into the creases all over the dough.
- Don’t be afraid to unknot and untuck the strands to get deeper into the dough. Just stick butter in there and knot/fold it back together.
- Also you can still tear into the gluten to access places to put hidden butter.
- The point of all of this is to put the butter so far in the roast that as the gluten reforms back together it will trap the butter into the roast giving it that juicy look and flavor.

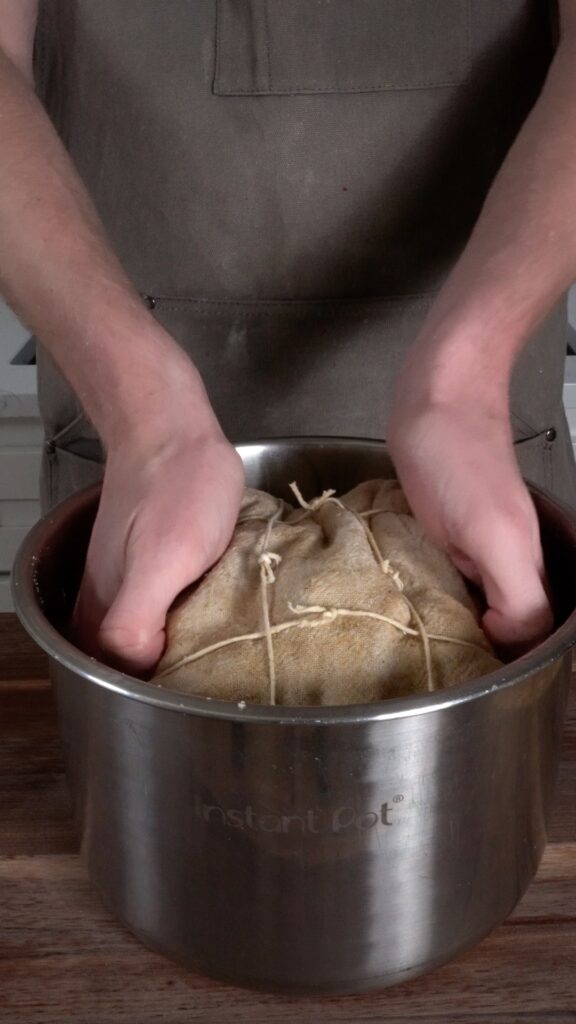
- Once the butter is secured in the ham and you’ve got it all knotted (it’s OK if it is loose), tie it up securely in a cheese cloth (I double wrap mine in these). Try and wrap so it forms into a cylinder.
- Let the roast rest all tied up for at least 30 minutes (or up to 24 hours in the fridge) if you need a break.
- Make the brine while it rests. and then slow cook in brine for 4 hours:

- After the cook the roast should be firm, and not squishy. If it is squishy it is not done.
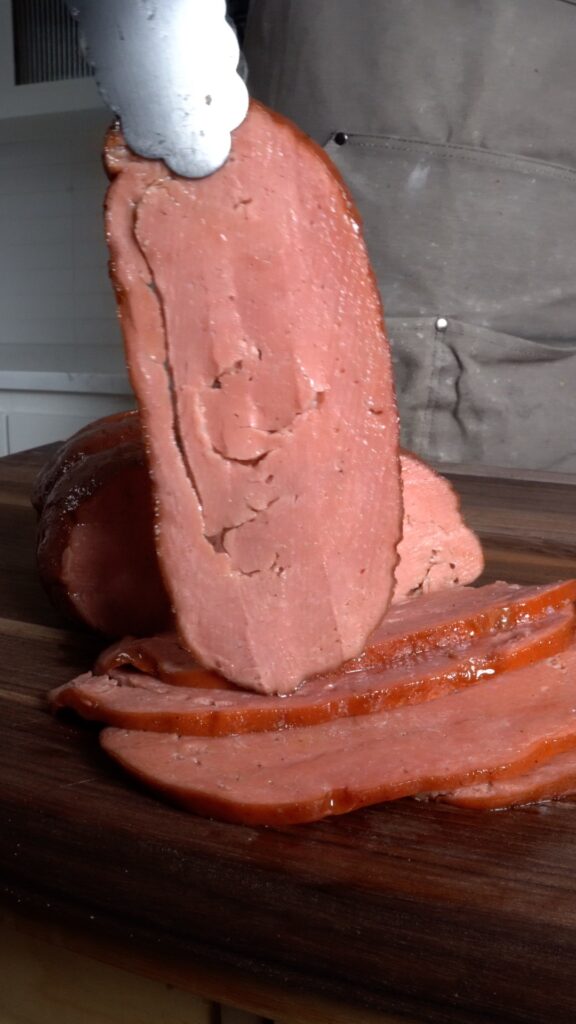
- Once the cook is complete let it cool to room temperature or let it sit overnight in the brine to gain better texture.
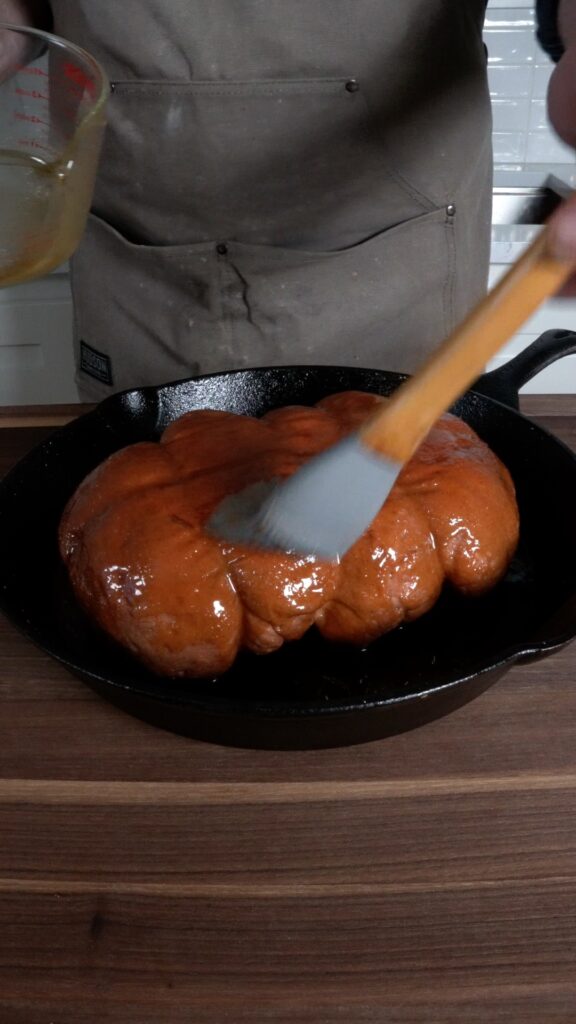
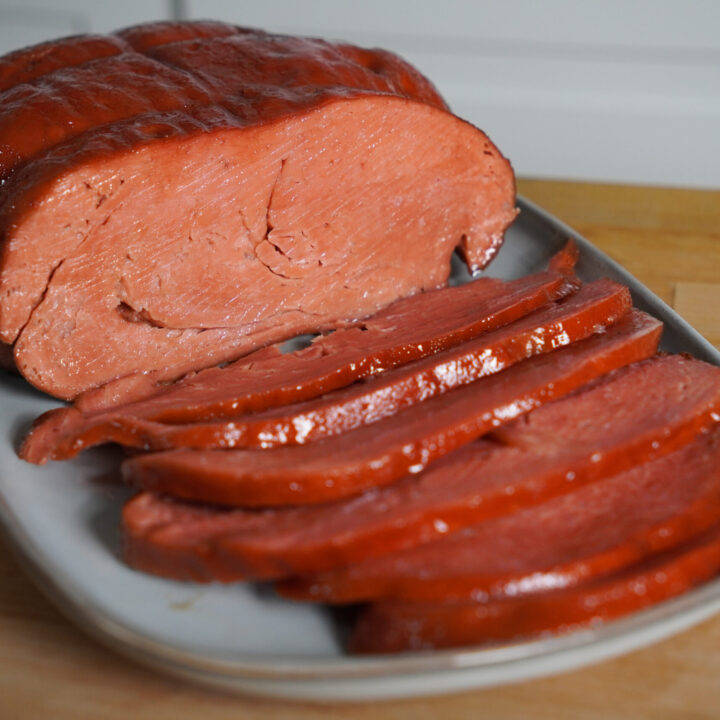
- Optionally, glaze the ham with half the glaze bake for 15, add second half of glaze. bake for another 15, it until it looks beautiful (it will) and enjoy. If you’re serving as a centerpiece, I highly recommend glazing for extra pizzazz wowza points.


Commonly Asked Questions
Can I substitute the RED DYE with another red coloring? Like beetroot powder?
No, not to my knowledge. I’ve seen people try beetroot powder and their ham turns grey. If you find a substitute (that you yourself have tested with this specific recipe) please send me a photo of your work on Instagram I’d love to find a solid substitute. Otherwise you can leave it out if you don’t mind your ham being…not a ham color…
Can I use LESS SALT?
No. The reason so much is called for is that A LOT falls out during this seasoning process. If you use less, you will likely under salt your roast, and that would suck.
Can I make this recipe without a slow cooker?
Yes, if you don’t have a slow cooker, you can use a dutch oven in a 300F oven. Make sure you leave the lid slightly cracked and check it every 45 minutes or so to add more water to the brine and ensure that it is not boiling. Do not let it boil.
Can I use Vital Wheat Gluten (VWG) instead of Wash The Flour (WTF) method ?
No VWG is a completely different technique than WTF. It can’t work. I have a full video on the difference between the two linked here.
How can I ensure the vegan ham has the right texture?
The key to the right texture is in the washing and tearing/knotting process. Don’t be afraid to absolutely tear up the gluten during the season, tear, fold technique step. Just make sure you throughly knot the dough back together and tie in a tight cylinder in the cheese cloth.
Is this recipe suitable for someone with a gluten allergy?
No. This is literally made of gluten.
Can I make a gluten free version of this recipe?
Unfortunately, no, it would fundamentally change the recipe.
What can I use if I don’t have mushroom powder?
You can buy mushroom powder here.
How can I add more smoky flavor to the vegan ham?
To enhance the smoky flavor, you can make your own smoked salt or buy it online. I cover how to do this in my first video on this ham here.
Can I prepare the vegan ham in advance?
Yes and I encourage you do so! You can let the ham rest for 24 hours in the fridge after you wash, and again if you like after you season/fatten. In fact, the more rest the better. Gluten loves to laze and rest to form deeper flavor and better texture. You can also cook the ham completely and let it chill in the fridge for several days prior to glazing and serving.
What are some serving suggestions for vegan ham?
Serve it sliced as a main course, dice it for salads, use it in sandwiches, or add it to soups and stews for extra flavor. Literally anything you’d use ham for.
How do I store leftover vegan ham?
Store the leftover vegan ham in an airtight container in the refrigerator for up to a week. Just like almost all seitan, this freezes SUPER well. It makes a lot so I like to cut the final product in half and save the rest for future ham eating.
Is this vegan ham recipe nut-free?
To my knowledge, yes, this is nut-free, but I am not an expert in this, so please check all ingredients yourself.
Watch The Video
The Ultimate Vegan Seitan Ham
Ingredients
- 10 lbs (4.54kg) of all purpose flour, divided
- 12 cups (2.6kg) of cold water, divided
- ¼ tsp and ⅛ tsp vegan red food dye, divided
- ½ cup (115g) of vegan butter (usually about 1 stick)
Seasoning mix:
- 1/4th cup + 2 Tbsp (100g) kosher salt, or smoked kosher salt
- ¼ cup brown sugar
- 2 tbsp onion powder
- ¼ cup mushroom powder
Brine:
- 1 tbsp of salt for every cup of water
- ¼ cup of soy sauce
Glaze:
- ¼ cup maple syrup
- ¼ cup brown sugar
- 1 tbsp liquid smoke flavoring
- 1 tbsp vegan Worcestershire sauce
- ⅛ tsp ground cloves
Instructions
- Create one dough ball by dumping 5 lbs (2.27kg) of flour into a mixing bowl, adding 6 cups (1.3kg) of cold water, and an ⅛ tsp of vegan red food dye. Knead for 5 min until you have a cohesive ball.
- Create dough ball 2 with the same amount of flour and water, except use ¼ tsp red food dye this time. Knead for 3-5 min until you have a cohesive ball. Let both ham balls rest in water for 1 hour.
- Now wash each ball in a colander or mixing bowl about 5 times until there is no starch left. The water at the end will be relatively clear and you want the dough to be washed until there are only small bits of starch left. There should be no starch spots bigger than a pencil eraser. For a full guide to how to wash the flour, see my video on the technique here.
- Let the washed doughs rest together so that they merge into one dough for at least 30 minutes or up to 24 hours.
- While that rests, create the seasoning mix by whisking together the kosher salt, brown sugar, onion powder, and mushroom powder.
- Next we’re going to rip the seasoning mix into the washed and rested dough. I like to think of this technique as Season, Tear, Fold. SEASON the top of the dough with about a quarter of your seasoning mix and rub it in with your hand. TEAR apart a thick part of the dough and rub in the seasoning to the unseasoned parts you exposed by tearing. You can tear multiple times before seasoning again. The more you tear, the better the final texture will be. It might seem like you’re destroying the dough, but by tearing apart, you’re breaking the gluten and when it rests and forms back together, the bonds will be imperfect which is what creates that satisfying bite. FOLD and stretch the dough onto itself to find unseasoned parts, then season again, repeating the steps. You will be able to tell when a part is unseasoned as it will be a lighter color then the seasoned parts of the dough. Repeat these steps (Season, Tear, Fold) until you have no seasoning left.
- After ripping in all the seasonings, knot together and tuck loose strands of the torn dough together to create a knotted ball.
- Grab roughly 1 tbps chunks of vegan butter and jam them deep into the creases and knots all over the dough. Don’t be afraid to unknot and untuck the strands to get deeper into the dough. Stick butter in there and knot/fold it back together. Also you can still tear into the gluten to access places to put hidden butter. The point of all of this is to put the butter so far in the roast that as the gluten reforms back together it will trap the butter into the roast giving it that juicy look and flavor. Once you've deposited your butter and wrapped it back up, it's time for the next step.
- Once the butter is secured in the ham and you’ve got it all knotted (it’s OK if it is loose), tie it up securely in a cheese cloth or two using kitchen twine (I double wrap mine in these). Try and wrap so it forms into a cylinder. Let the roast rest all tied up for at least 30 minutes (or up to 24 hours in the fridge) if you need a break.
- Make the brine while it rests by combing the water, salt, and soy sauce.
- Submerge the dough that is tied up in cheese cloths and slow cook in brine for 4 hours. After the cook the roast should be firm, and not squishy. If it is squishy it is not done and it is possible your slow cooker is not hot enough. Finish cooking it on the stove by gently simmering for another hour or so. Cook until firm. Once the cook is complete let it cool to room temperature or let it sit overnight in the brine to gain better texture.
- Optionally, mix together the maple syrup, brown sugar, liquid smoke, vegan Worcestershire sauce, and ground cloves. glaze the ham with half the glaze, bake at 325F for 15 minutes, add second half of glaze, bake for another 15, and serve hot. If you’re serving as a centerpiece, I highly recommend glazing for extra pizzazz and wowza points.


This looks gorgeous & I’m due to make more ham! One question – when slow cooking for the 4 hours, is that on high or low (assuming you’re using a slow-cooker) Thanks as always!
Great question! I think that depends on how hot your slow cooker gets. You want it to be around ~190F+ and no higher than boiling (212F). Seitan is done when it hits 170F internally. This is a big roast so it takes a while!