The Ultimate Guide to Vegan Cheese
As an Amazon Associate I earn from qualifying purchases.
Not too long ago there were only one or two options for vegan cheese in the grocery store, and then one wonderful day, we were burdened with the wonderful curse of choice. It is a fantastic problem to have to walk into a major grocery store and be intimidated by the many options for vegan cheese.
Since the world of vegan cheese is ever changing, I thought I’d share some of the “evergreen” things I’ve learned during my journey of how to pick and melt any vegan cheese on the market.

Where to start:
Being successful with vegan cheese doesn’t start in the kitchen. It starts in the grocery store aisle. Before you make your grocery run, consider what you’re making and buy the right cheese for the job! Before we consider the application, we also need to consider the brand and type of cheese we’re buying. I will cover those below.
Where do I find vegan cheese in the store?
This might seem like a no-brainer, but sometimes stores will put vegan cheese right next to the animal-based cheese (where it belongs IMO) or hide it in the “penalty box” AKA the weird-crunchy-organic area, usually near the produce, that has all the other non-traditional ingredients.
It is also possible that it’s hidden all over the store like you’re part of some sort of frustrating scavenger hunt. My advice is to keep your eye out in all sections of the grocery store and occasionally check out the non-vegan sections you usually breeze past.
Many major groceries also have apps where you can search your store’s inventory. Try searching for vegan products every once in a while. There could be some hidden throughout the store that you haven’t found by walking around.
Be wary of non-dairy cheeses that aren’t actually vegan!
I feel like it is a rite of passage for new vegans to buy non-vegan cheese that looks like it is vegan. You might be thinking – oh sweet! Almond cheese? Sounds great. But wait, it’s NOT VEGAN!

What brand should I buy?
There are many different brands out there, and I won’t be covering every single one. You usually can’t go wrong buying a known brand name vegan cheese.
This post is not sponsored so I won’t be saying individual brand names, but if you’ve heard of the brand before either as a vegan cheese or other plant-based product company, the product will probably be fine. Most well established brands of cheese will have a quality standard. That said, some brands market their product as “artisanal” at a high price point but do not deliver on the expected value and quality.
At the time of writing, there are some new vegan cheese brands that have just appeared on shelves, usually sold at a discount, and many of them just aren’t that great. They will be on the shelf one day and gone the next. Pick up what you want, but I prefer to not gamble and just pay the extra buck or two for the known commodity.
What are the main types of vegan cheese?
There are three main types of vegan cheese products on the market:
- Pre-shredded
- Pre-sliced
- Block
Each has their purpose and use cases so I’ll walk through each to help you understand when you should buy each type.
Let’s start with the one we’re all the most familiar with: pre-shredded cheese.
How to Melt Pre-Shredded Cheese:
Before we dive into how to best use and melt them, we need to understand what exactly makes pre-shreds unique…and it isn’t because they are already shredded…!

What are shreds?
Just like animal-based pre-shredded cheeses, these are considered the lowest quality type of cheese you can buy.
That’s because they have more stabilizers in them than other types. The stabilizers ensure the cheese doesn’t clump-up in the bag while on the shelf waiting to be purchased. It is purely aesthetic from the manufacturer’s perspective. Due to this, shreds are the most difficult form of vegan cheese to melt and I think the stabilizers also throw off the texture as well as giving the cheese a “sticky” mouthfeel.
Even with this innate issue with them, they still have their place. So don’t worry if you already bought a bag. Here is what to do:
How can I best melt shreds?
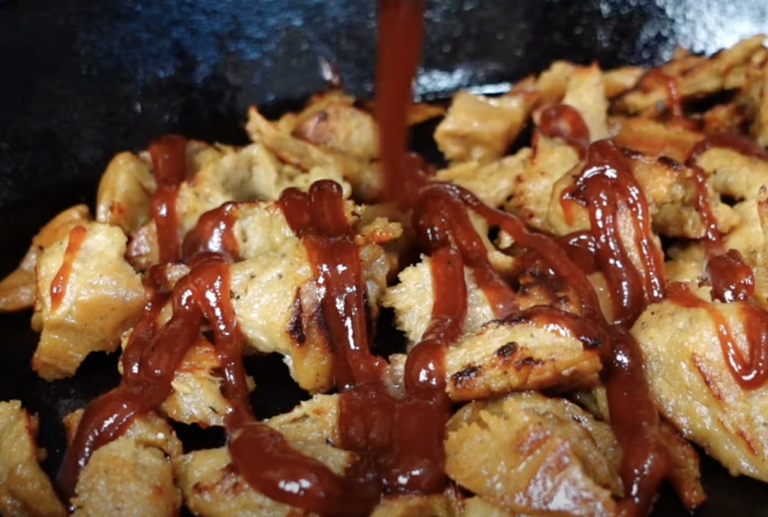
We’ve all been there. You pop open a bag of pre-shreds, add it on a hot meal as a topping, and it just….sits there! Sad, slightly wet, and unmelted looking back at you for mercy. This sadness is compounded if there is someone nearby who is getting an introduction to plant-based cheese through your meal.
This sad non-melt is because shreds are best melted inside of something, like soups, stews, scrambles, or anything where they are surrounded by heat. Shreds need more help to melt than other types of cheese. All you need to do is increase the surface area to help them melt properly.
You can also steam shreds to get them to melt. This trick is a bit more difficult, but it works like a charm! Try adding shreds on top of your desired food cooked in a pan, spritz the edges of that pan with water, and then cover. The steam increases surface area, yielding a better melt. It is also heated from the bottom by the hot steamy food in the skillet, making for a better melt.
Why shreds are not the best for pizza..
I have not tried this with all types, but you can melt Daiya shreds directly on top of a pre-heated non-stick pan. Check out my grilled cheese video for a full guide to the technique: https://youtu.be/OqHsCh1p27k
Pizza deserves its own section as it is a good example of what can go wrong with cheese shreds. I’ve often heard from fellow vegans about their frustration with cooking pizza with shreds!
When you add shreds on top of a cold pizza and launch it into the oven to cook, the radiant dry heat only affects the top of the cheese. Since the direction of the heat is one way, the shreds don’t “come together,” keeping the cheese from melting. Often the shreds will look stringy on top of the pizza.
I have a full guide on vegan pizza that I recommend you watch here to get all the tips/tricks to making incredible vegan ‘Za in your own kitchen here: https://youtu.be/OTejLSq4ikk

Two other quick tips on pre-shredded cheese for a better melt:
- If you need to melt shreds on top of something, break them down further. Try pulsing them in a food processor to increase surface area.
- You can also mix in some neutral oil, like olive oil, with the shreds to help transfer heat leading to a more even melt. This technique also improves flavor as, scientifically, fat carries flavor.
How to Melt Pre-Sliced Cheese:
Now that we’ve covered shreds, let’s talk about another common type that we all know and love: pre-sliced cheese.

Most of the time we just use a slice on a sandwich, but sometimes we want it melted. Let’s talk about how best to do that.
Pre-sliced has a few things in common with shreds: it has stabilizers so that the slices don’t stick together before you use it, and heat from more than one direction helps it melt best.
Here’s how to melt cheese slices on a sandwich:
It is best to pre-heat your sandwich as the best way to melt vegan cheese is when what you are melting it on is already hot.
On a grilled cheese, (see my grilled cheese video here) that looks like toasting the insides of the bread first, flipping, adding cheese, and toasting the outside.
By toasting the insides of the sandwich, you not only get a better melt, you also get a great texture since the melted cheese won’t make the bread soggy.

Burgers are a great example of how melting slices on something hot works. When you flip a burger on a grill, add cheese, and close the lid, the cheese is melting from both the radiant heat as well as the heat of the cooked burger.
In my experience the newest Daiya cheese slices can also melt well directly on a preheated pan. They will stick and then become unstuck within about 30 seconds to a minute of cooking.
How to Melt Block Cheese:
Now that we’ve covered shreds and slices, let’s talk about my personal favorite type: the block.

For my money, solid blocks are not only the best option, they are the best value. Here’s why:
- Blocks are the most versatile. They can be turned into slices and shreds whenever you want and because they are a block, they have less stabilizers than pre-sliced and pre-shredded, so they melt easier.
- If you have a decent shredder, you can control how big the shreds are, and because we already learned that surface area is critical to a good melt, I personally like to use the smallest holes on my shredder for shredding block cheese.
It may be an extra step, but I think shredding your own cheese and cutting your own slices are worth the effort.


What equipment do I need to use vegan cheese?
I recommend two items:
- A good quality cheese grater that is sharp enough to easily shred a soft-ish block of cheese and has a good handle. Here is the one I use: Cuisipro 4 Sided Box Grater

- For specialty cheeses, like vegan parmesan, where I want to get a super fine shred, I really like to have a microplane on hand. Here is the one I use: Microplane

These items are surprisingly useful in the kitchen, from microplaning garlic to shredding a whole onion. I keep coming up with uses for my grater and microplane.
Conclusion – Major Takeaways:
- To get the best melt from vegan cheese, use the right cheese for the job.
- Blocks are the most versatile option as they have the least amount of stabilizers hindering them from melting.
- A block of cheese will almost always be the best choice possible for any dish as you can also easily turn a block of cheese into shreds or slices as desired. Those shreds and slices will melt better and have a better texture because they have fewer stabilizers than the pre-packaged shreds and slices.
- If you only have pre-shredded or pre-sliced cheese, make sure you use more than one direction of heat and/or increase surface area of the product before applying it to your food.
Commonly Asked Questions
What about other types of cheeses and their best use cases?
Miyoko’s Liquid Mozzarella:
This is the only type of cheese I’m specifically calling out as it is so different from any other types and I know it is a fan fave.
I’m seeing this product in stores less and less these days, so I’m not sure if it will stick around. For those who can still find it, follow the instructions on the packaging as those are designed with very specific use cases in mind (usually this is only used on pizza).
My only advice is to experiment with it on different types of baked goods other than the obvious use case (pizza).


Parmesan, cream cheese, and other types of cheeses:
I won’t spend time in this post covering niche cheeses used only for one to two specific use cases or that you can only find in some places. I trust that you already know to use cream cheese on bagels or to put specialty block cheese on a cracker.
If you come across a vegan cheese that you don’t know what to do with, my advice is to use it exactly how the non-vegan version is used. Have a block of parm? Use a microplane or the small holes on a cheese grater like you normally would. Boursin? Put on a cracker or put it in pasta and enjoy.
All that said, the general physics of heat always apply: it’s easier to melt cheeses with the least amount of stabilizers.
If you are having trouble melting any type of vegan cheese (that is supposed to be melted), add oil and try to break it down further so that more surface area is in contact with the heating source.
Also, remember that it is easier to melt something when what you are melting it on is already hot, like a flipped burger. More heat directions the better.
I won’t cover every brand and all cheeses in their product line, but there are certainly some low quality products that will not melt no matter what you do! You’ll find and remove those from your grocery list quickly.
Watch The Videos
Vegan Inside-Out Grilled Cheese
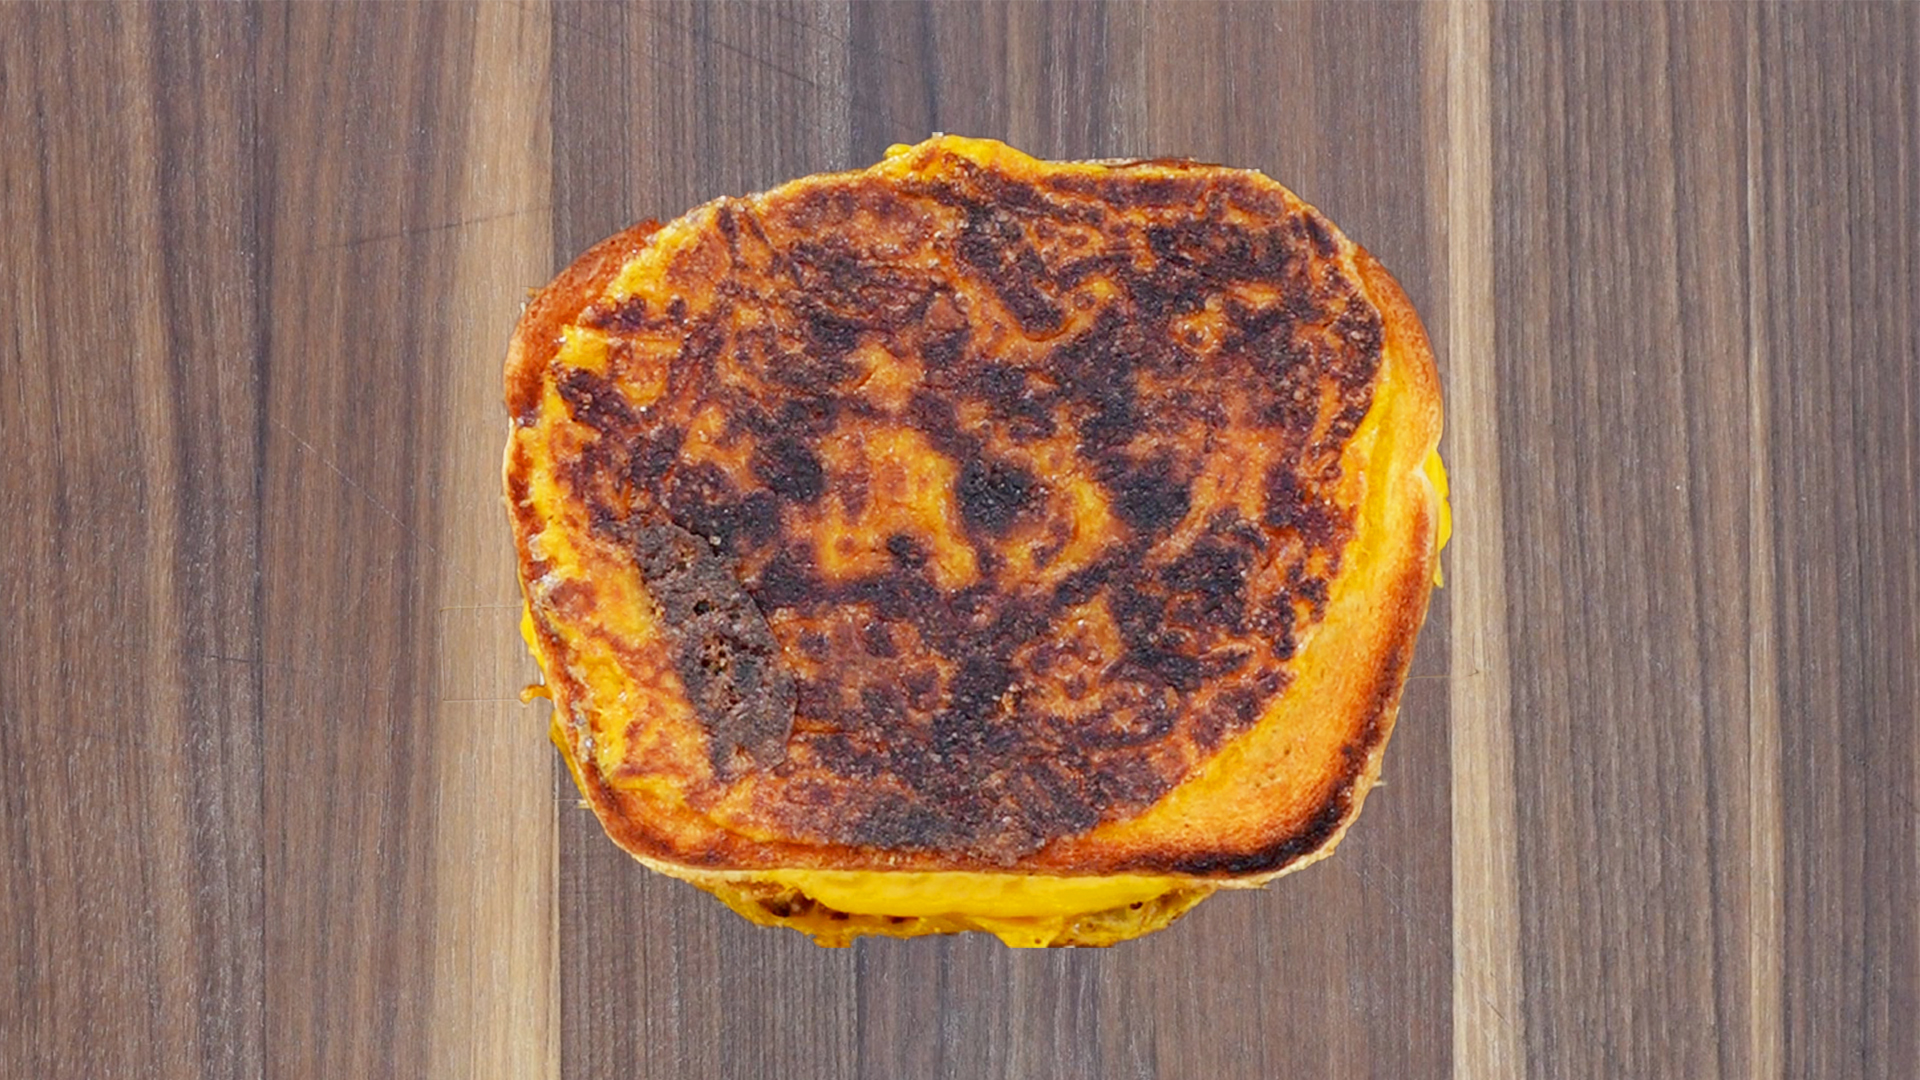
This grilled cheese is like nothing you've ever had. We've got cheese on the inside AND outside.
Ingredients
- 2 slices of white bread (make sure it's vegan)
- 1 slice of vegan cheese
- 1/2 Cup loosely packed vegan cheese shreds, divided (or 2 slices of vegan cheese*)
Instructions
1: Preheat a pan to low to medium heat. Add a slice of bread to the pan, then a slice of cheese, add your second bread slice on top. Cover with a lid and let cook for 3 minutes checking every minutes to see if the pan is toasting the bread too fast. Adjust heat as needed.
2: Once the bread is a beautiful golden brown, flip, cover, and let cook for another 3 minutes or until the other side is toasted.
3. Remove the grilled cheese from the pan.
4: To the same pan, still preheated to low to medium heat, add a generous pinch (about a loosely packed 1/4 cup) of shredded vegan cheese to the pan and make a circle the size of your bread. Use a spatula if needed to shape.
5: Once the top of your cheese pile begins to melt, place your grilled cheese on top of the melted cheese. Let cook, uncovered, for about 3 minutes on low heat. Again, adjust the heat as needed. We're cooking this low and slow.
6: When you have about 30 seconds left in step 5, on the same pan that your sandwich is on, add the rest of your cheese (another rough 1/4 cup). Flip your sandwich so the "un-cheesed" side goes face down on the new melted cheese. Cook for another 3 minutes, adjusting the heat as needed.
7: Cut and serve!
Notes
- I used Daiya shreds for this and it worked great, if you use a different brand of cheese, you may get different results.
- You can use slices in place of shreds if you only have that on hand*